Wednesday, May 30, 2012

Art Journaling with Iamroses

1
I can honestly say I do not usually know what I am going to create when I open up my art journal but I usually have a product in mind that I want to incorporate and then I let my imagination guide me.
I wanted to challenge myself this time around and create my art journal with some Iamroses.  I don't usually like to make my journals bulky so I knew this would be a challenge but when I received my DT package I opened it up and saw a variety of flat petals and leaves.....  the creative juices started flowing and the creative process began.
I made a full tutorial video for you and at the end of the video you can find the names and links to all the products I used to create this page.


PRODUCTS USED:
Green Leaves
Tim Holtz Stamp - Mini Ornates


Thank you for stopping by!
Limor Webber

Read More »

Saturday, May 26, 2012

"Sparkle Layout" by FabScraps Victoria Collection

1
Hello Crafters! 
I wanted to share with you a layout I created of my two little "sparklers" using the new amazing Victoria Collection by FabScraps.  I had such a blast creating this layout because what's so amazing about this line like all of FabScraps lines is that the amount of coordinating chipboard and embellishments is more than you'll ever need to complete any project.
I have included a full set of instructions on how I created my layout for your convenience as well as a full product list.


"Sparkle Layout"
For This Layout You Will Need

  • MC DC03 Victoria Roses
  • MC 0049 8x8 Paper Book
  • MC49 001 Die Cut Journal Book
  • ST49 001
  • C49 001
  • C49 003
  • C49 007
  • DC49 007 Ballet Shoes
  • DC49 024 Sparkle - Word
  • Spellbinders Shapeabilities "Butterflies Two" S3-146
  • Spellbinders Shapeabilities "Floral Doily Motifs" S5 - 041
  • Two Border punches
  • White, Pink and Green Acrylic Paint
  • Glitter Glue
  • Brads for flower Centres
  • 3D Foam Dots
Instructions

  1. Ink the edges of C49 003 Patterned Paper with White Acrylic paint
  2. Cut the little girl with the flower pot from Patterned Paper C49 001 and ink edges with white acrylic paint
  3. Cut out two Floral Doily Motifs ( Largest Doily) out of Patterned Paper C49 001 and ink edges with white acrylic paint
  4. Cut out and emboss two butterflies out of Spellbinders Butterfly Die out of Patterned Paper C49 001 - Ink edges and body with white and pink acrylic paint
  5. Cut a 4x12 inch strip of Patterned paper C49 007 and use one of the border punches to punch one of the long sides. - Ink edges with white acrylic paint
  6. Cut a strip of C49 001 measuring 1/2 inch x 12 inches - use a second border punch and punch both long sides.
  7. Print a 5x7 photo ( sepia or Black and white) and ink the edges with pink acrylic paint
  8. Mat Photo on one of the green papers from the MC 0049 8x8 paper book
  9. Mat the matted photo onto a second piece of Pink paper from the MC 0049 8x8 paper book - Ink edges with white acrylic paint.
  10. Punch out the flowers and leaves as shown in photo and using pop dots stack on top of each other to create a 3D effect - Use any centre of your choice
  11. Ink all leaves using green acrylic paint to give it a distress look 
  12. Paint DC49 007- Ballet Shoes with light pink acrylic paint and use Stickles or glitter glue to mark the details of the shoe
  13. Paint DC49  024 - Sparkle Word with green paint and add glitter glue to the two stars.
  14. Cut out two tags from the MC49 001 Die Cut Journal book - cut out one of the centres from the tags and with a 3D foam dot place it on top of the other tag. 
  15. Assemble all pieces as per Photo provided - Note using 3D foam dots on all the embellishments will give your page dimension.
Thank you for stopping by!

Limor Webber
Read More »

Friday, May 25, 2012

Art Journaling Friday

3
Welcome to Art Journaling Friday!!


You know when you have something in mind and you are certain you can replicate it?..... well, that's not what happened here LoL!! I had an image in mind and I started creating when I came up with this.
What I love about art journaling is that your imagination takes you in so many different directions and by the time you are done you say " How did I come up with that"?! .  The only way to learn new techniques, textures, mediums etc is to just create and be "Brave"!!! Join me every friday for a new art journaling page where I will be creating from the heart and cover new techniques.
Check out the video below for a step by step process of creating this page.


MATERIALS USED

Strathmore Mixed Media Journal
Americana Orange Acrylic Paint
White Acrylic Paint
Magenta Acrylic Paint
Old Credit card
Black Archival Ink
Thin Paint Brush
Large Flower Stamp
Dylusion Stamps


Read More »

Wednesday, May 16, 2012

1
Hi Crafters!
It is not often I get to create projects with my "Hoard Vault Items".... ok come on fess up! you all have one LoL!.  I was fortunate enough to go on a scrapbooking retreat with my girlfriend and I created this mini album with all sort of miss-match pages using the "Angel Wings" as my front and back covers.
Below you will find the photos of all the pages and if you click on the video link you will get to see a full description of the album.
Enjoy!


Products Used:
Lindy's Stamp Gang Starburst Spray - Cocobean Copper
Lindy's stamp Gang Starburst spray - Fuzzy Navel Peach
Lindy's Stamp Gang Starburst Spray - Cotton Candy Pink
Prima Patterned paper " Almanac" Collection
Prima Swirl Black bling
Prima Lt Brown w/flowers bling
Prima Antique w/flowers
Canvas Resist
Prima Pixie Vine ( Nature Garden)
Vinetta Almanac flowers
Mountain Lilly Flowers
Robin's Egg Flowers
Chipboard Pieces - Almanac Collection
Wood Tickets
Decorative Wood Embellishments
Namazzi Charcoal flowers
Charme Rose Almanac
Vinetta Almanac Flowers
Floret Camille Flowers
Flock Rub-ons
Vintage Trinkets ( Heart)

Thank you so much for stopping by!!!

Limor Webber


Read More »

Tuesday, May 15, 2012

Gone Fishing

1
I was digging through my box of photos and found these hilarious photos of my husband getting ready to fish on our anniversary weekend away.  He was being very silly and posing for me so it's only fair I get to scrapbook them right?... good I'm glad you all agree.
I decided to use the Rustic Collection by FabScraps to create this 12x12 layout and at the bottom of the photos there will be some guidance for you as to how I created the layout and some of the embellishments.


FABSCRAPS MATERIALS USED:
C48 001
C48 002
C48 004
C48 006
C48 008
ST48 001
MC48 001 Die Cut Journal Book
DC48 008 Wood Tress
DC48 021 Gone Fishing - word


To Start: Gather your Chipboard Pieces
  1. Use some glue on the one side of the trees and glue onto paper C48 002 ( green patterned paper) - using a craft knife, cut around edges.
  2. Using Versamark Pen - Versamark fishing rod in the Gone Fishing sign and pour embossing powder ( Heat Set) - Repeat steps for the rest of the sign.

Designing the Layout

  1. Take your photos and mat them onto C48 006 and cut around the edges leaving a 1/4 inch of edging.  With your third photo ( as your focus photo) mat it onto C48 004 to give it more of a "pop"
  2. C 48 002 - Cut 1 inch off of each side of the paper - Ink edges with Distress ink ( Frayed Burlap) and place onto C48 004
  3. Cut one large strips one from paper C48 008 and using a border punch, punch one of the sides and place half way under photos so fancy border is sticking out (ink Edges)
  4. Using a journaling tag follow the same steps as step #3.
  5. It's now time to start embellishing your layout.  I scrunched up the sun dial - un-scrunched it and inked it with Distress ink ( place on page as per picture)
  6. Staple the two fish tickets by one of the photos using the Tim Holtz Tiny attacher ( ink edges of tickets before stapling)
  7. Taking one of the Journaling tags I folded it in half, stuck a foam pad in between folded halves for some volume and used more foam dots to place down onto page.
  8. Using a Prima branch, I cut it in half and placed it on page to create a border using my Pine trees as my anchor.
  9. Place the foot prints from the sticker sheets on layout as desired.
  10. The last piece is using some die cut leaves and branches to fill in any areas that are bare ( inking all edges with Frayed Burlap)

Thank you for stopping by!

LIMOR WEBBER


Read More »

Wednesday, May 9, 2012

Art Journal using Lindy's Stamp Gang and Crafter's Workshop Templates

0
Hello Crafters

I started a new Art journal a couple weeks ago and I've decided to take you on my art journey adventure with me.  I will be doing a weekly Journal Entry with a full video tutorial starting ....... well, right now!
Here is my first ( actually my second page) of my journal and I decided to use the NEW amazing Flat Fabios by Lindy's Stamp Gang as well as my ridiculous addiction of The Crafter's Workshop Templates.
Here is a photo of the finished journal page but please check below and you will find the full Video tutorial.  At the bottom of this post you will also find all the products used for your convenience.


Products Used:

The Crafter's Workshop - Bricks TCW191
Liquitex - Super Fluid Acrylic Paint ( black)
Faber Castell - Black Marker
White Acrylic Paint

Thank you for stopping by!

Limor Webber


Read More »

Monday, May 7, 2012

MAY IARCC

7
Hello Crafters!!!
You guessed it! it's May and it's time for another IAMROSES Color Challenge.  The challenge is happening right now so head on over to the IAMROSES CHALLENGE BLOG for more details and challenge rules.
Before you head on over I wanted to share my project for the challenge which is a layout I created of me and my youngest daughter Ava in honour of Mother's Day.


FULL VIDEO TUTORIAL


Iamroses Products used ( links provided):

Other Products Used
Michaels christmas decorations ( purple balls)
Prima canvas resist butterfly
Chipboard words ( unknown)
Webster's Patterned paper - Hollywood Vogue Collection
Glitz Patterned Paper - Dance in Sunshine Collection
Heidi Swapp - Color Magic Resist Paper
Martha Stewart Border Punch

THANKS FOR STOPPING BY!!! GOOD LUCK!


Read More »

Wednesday, May 2, 2012

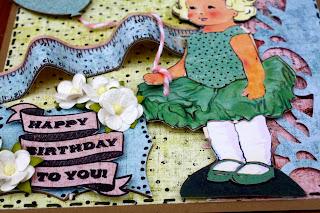
Victoria Collection Birthday Card

2
I am so excited to be able to share with you my first project with the new collections by Fabscraps.  I have to tell you guys that the collections are to die for! I can't get enough of them!
To get started with my first DT project I decided to create a card using the "Victoria Collection".


The "Victoria Collection" has the most amazing Journal book that includes a variety of paper dolls with their matching clothes and shoes! ( do you remember paper dolls??.... some of us do LoL)
I did a full tutorial on how I put together this adorable card and you can find the video at the end of the post.
A little close up.  I really challenged myself not to ink any edges as I am addicted to inking and I have to say I am happy I did as it allows us to see the true beautiful colors of the papers.
Inside of the card

Video Tutorial


Fabscraps Products Used:
Victoria Collection - MC 0049 8x8 Paper Book
Victoria Collection - MC49 001 Die Cut Journal Book
Die Cut - DC49 004 Little Girl/Match Journal book
Die cut - DC49 013 Balloons ( 3 shapes)

Other products used:
S10 - Iamroses flowers
American Crafts Birthday stamp
MME Twine
American Crafts Pow Glitter Paper
Martha Stewart Punch
EK success Punch - Rose Bush 2-in 1 Edger punch

Thank you so much for stopping by!
Limor Webber


Read More »

Tuesday, May 1, 2012

6

1000 YOUTUBE SUBSCRIBERS GIVEAWAY
SPONSORED BY: FABSCRAPS


I can't believe how fast time has gone by! I remember opening my Youtube account last year thinking that I just wanted to watch other people share their projects, then Marion Smith had a contest and I thought I would throw the hat over the fence and make my first video.... the rest is history! 
I want to thank all of you for subscribing to my channel and allowing me to share my passion with you all.  Fabscraps has been so generous in sponsoring this awesome giveaway and they will be giving away all the products I used in my project.
Check out the Video link below to see how you can have the chance to win some Fabscraps goodies.

Thanks for stopping by!

Limor
Read More »